
by AGParts Education | Chromebooks, Internet Safety, Laptops, Tips and Tricks
Almost 90% of teenagers have home access to a computer and almost half of teenagers say they’re online almost constantly. It’s more important than ever before to teach internet safety for high school students. This is due in part to complacency—with such computer prevalence, it’s easy to become relaxed and fatigued on the most basic internet safety principles.
Why? Well, let’s not forget that teenagers (13-17 years old) grew up with this technology. In the early and mid 2000s, when this age group was born, computer ownership fluctuated around 75% in US. The iPhone, which not only made the smartphone a household name, but a household requirement, launched in 2007. This technology was in their hands earlier than any other generation.
How do you combat this complacency? While it may seem paradoxical, it’s important to return to the basics, but also teach more advanced safety tips. Here are five tips in teaching internet safety for high school students:
Teach the Risks & Rewards
Internet safety all starts with educating all students on the dangers and risks of being online. Be open and honest. Don’t sugar coat—transparency is key. Since high schoolers are older, this is a great time to share any unpleasant personal experiences you’ve had with the internet. This is not to paint the internet as a bad place, but to remind them that there are dangers.
It’s also important to remind high students that what they contribute to the internet, including what they share on social media, can stay with them a long time. Social media is often used a tool to screen candidates for jobs and college entrance. They should never post anything that is discriminatory to anyone, even in jest.
Teach the Art of Data Mining
Encourage older students to perform an exhaustive data mine on themselves once a quarter. For someone who has regularly Googled herself over the years, I was shocked what my latest results returned. An uncomfortable amount of personal information including current address, old phone numbers and addresses, family names—the works! Much of this information was on third party sites that I could contact to remove my information which was a huge relief.
Students should do just this, and when they find personal information that they do not want online, help them contact the sites to remove the information. Even if the information is outdated, it should still be removed. Old contact info can often be used for verification purposes in setting up bank accounts, applying for personal, auto, or student loans, etc., as well as security questions for important online accounts.
They should:
- Search names, usernames, and nicknames using quotation marks.
- Search on various search engines (Google, Bing, etc.).
- Sign out of any browser prior to searching as results can be filtered when signed in.
- Use various browsers to perform the search (Chrome, Edge, Firefox, Safari, Opera, etc.) as they will yield different results.
- Go past the first page of results until the name no longer appears (five pages deep at minimum).
Enable Privacy Settings on Social Media
With 27% of teenagers using social media hourly, don’t skip this tip! Encourage your students to restrict their privacy settings appropriately across all social media platforms.
Social media privacy settings have come a long way. Largely, they are much more granular which gives the user more control. However, this means there are more settings, and it’s easy to miss one or two that could be set to public when they should be restricted. Comb through privacy settings together to ensure none are missed.
Students on social media should also:
- Regularly review their friends or followers on social media and remove anyone that should not be there.
- Regularly review their posts and remove those they would not want a parent, teacher, employer, or college official to see.
- Regularly review posts, images, and videos in which they are tagged, and remove tags as appropriate.
Don’t Disclose Personal Info to Strangers
This seems like a no brainer, but it deserves its due and bears repeating. Never disclose sensitive information online, especially to strangers. Under no circumstances! This includes where they go to school, their address, their phone number, their various social media handles, etc.
Since teenagers have been around the internet for so long, they may start to feel like a veteran. They could start to feel like they could spot a fake. Most likely not true. It doesn’t matter how trustworthy the person may seem; you simply don’t know the real person on the other side of the screen. All it takes is one conversation to let sensitive information slip into the wrong hands.
Teach Digital Best Practices
Ideally, internet safety for high school students falls into a larger lesson on digital literacy, a core tenet of digital citizenship. Digital literacy is a broad topic, but it deals with how to interact responsibly online and evaluate information online effectively. Safety falls into digital literacy as well.
While this may take more time to teach, here are a few key best practices students can follow immediately:
- Use strong alphanumeric passwords: teach about password safety and password algorithms.
- Make sure parents or guardians have access to student passwords. Students can write passwords on a piece of paper, place it in a sealed security envelope, and store in a safe, but visible, place so their parents can access passwords in case of an emergency.
- Stress the importance of logging out of online accounts by physically signing out, not just closing the browser window. This is especially important if students are sharing devices.
- Encourage students to regularly back up their files including important emails and photos.
If You See Something, Say Something
Perhaps the most important and universal tip—if you see something, say something. As digital citizens, we are responsible for ourselves and others. The internet is not just a place where your identity can be stolen. It’s also the playground for cyberbullying. Give examples of cyberbullying. If a student sees suspicious, discriminatory, or uncouth behavior, encourage them to bring their concerns to a responsible adult.
In order for this tip to work, it’s crucial to create an honest and transparent environment where students feel comfortable to bring concerns to an adult, whether that be their teacher or parent.
Even if you create the most trusting environment in the world, teenagers can still be deterred from bringing their concerns to an adult. This is why it’s so important to check in with high school students regularly about their online and social media habits. Pay attention to what they’re interested in online and who they are talking to. Limit access to certain sites to avoid potentially harmful situations.
While teenagers may be complacent to technology, it’s always important to teach internet safety for high school students. Use these five tips to remind older students how to stay safe online.
AGParts Education partners with 7,500+ innovative 1:1 school districts nationwide in Chromebook parts procurement and buyback. For more info, contact us today!

by AGParts Education | Chromebooks, Internet Safety, Laptops, Tips and Tricks
With more than 175,000 children going online for the first time every day, internet safety for students is more important than ever.
While there are many safeguards in place, the internet is not inherently safe. A seemingly friendly sea of information and connections can quickly turn into a barren wasteland when personal information falls into the wrong hands or students are victims of cyberbullying.
As 94% of children have access to the internet, it’s crucial to equip your students with the skills they need to stay safe online. When you think of internet safety for students, think SMART.
What is SMART?
SMART is an effective pneumonic for students to remind them of internet safety best practices. While SMART can be used for kids of all ages (and adults for that matter too!), it’s especially helpful for younger students to practice, remember, and apply, and lays a great foundation. Older students can find more advanced safety tips in our guide to internet safety for high school students.
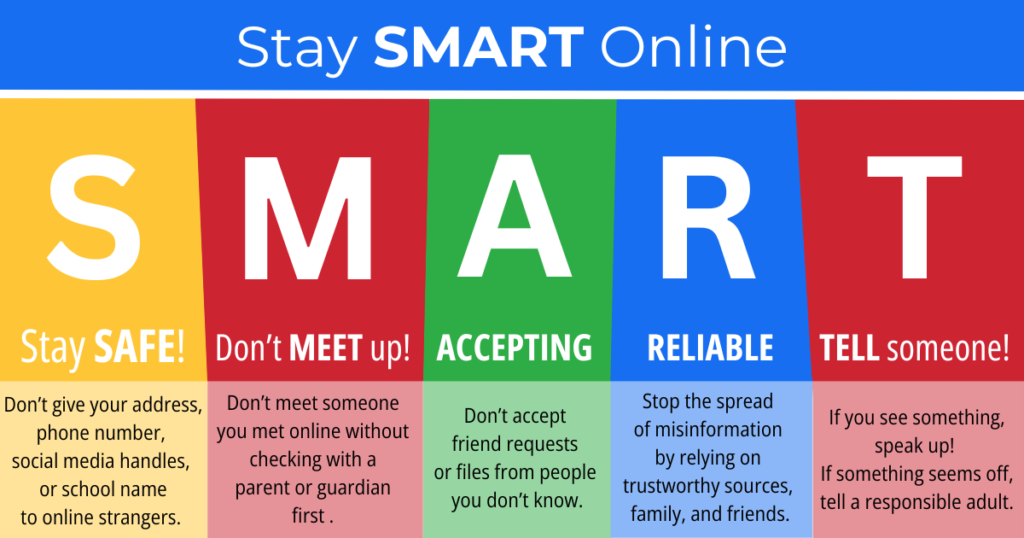
Stay Safe
The first key to staying safe online is keeping your personal information private. Students should never disclose personal information to strangers, especially unchaperoned. No exceptions. This includes name, address, phone number, social media handles, photos, and school name.
It’s crucial to remind students that it doesn’t matter how trustworthy the person may seem—a stranger is a stranger. As much as a student may think they know someone they met online, the reality is, they don’t.
Don’t Meet Up
Akin to keeping personal information private, is the importance of teaching students that meeting an online stranger in person can be extremely dangers. Students should always check with a parent or guardian about meeting an online stranger, and the parent or guardian should be present during all meetings. No matter what!
Again, this comes down to reminding students that you never really know who is on the other side of the screen. All it takes is one meeting alone for things to turn disastrous.
Accepting
This may be a difficult one for students to follow, but they should never accept friend or connection requests from people they don’t know. They should ask a parent or guardian first.
Likewise, they shouldn’t accept files (emails, texts, documents, and photos) from strangers either. Opening files from strangers can take damage their devices if the files are corrupted with a virus.
Remind students to block users they don’t know after receiving an unwanted file. This can be easily be done by blocking users under settings in both email and cellular services.
Reliable
This next key to internet safety for students is two pronged. As digital students, student need to do their part in stopping the spread of misinformation by verifying information with reliable sources prior to sharing it. Even if information isn’t shared, it’s always a good habit to compare the source to another to confirm its veracity. If something seems too good to be true, unusual, or extraordinary, chances are it is.
Reliability also extends to those students meet online. They should rely on those they already know and trust, like family and friends.
Tell Someone
Perhaps the most important key: if you see something, say something! Internet safety for students goes beyond the perils of stolen information. The internet is the virtual playground for cyberbullying. Create an honest and transparent environment where students feel comfortable to bring concerns to an adult, whether that be their teacher or parent.
Even if you create the most trusting environment in the world, students can still be deterred from bringing their concerns to an adult. This is why it’s so important to check in with students regularly about their online and social media habits. Pay attention to what they’re interested in online and who they are talking to. Limit access to certain sites to avoid potentially harmful situations.
Other Tips
In general, it’s so important for students to understand:
- The risks and rewards of the internets. It’s a great tool when used appropriately and safely.
- It’s very easy to lie online, and it happens more often than they might think. Someone they meet online is a stranger, period! It doesn’t make them good or bad, but someone the student simply does not know and should not easily trust.
- They should always check with an adult they trust if something doesn’t feel right.
Internet safety for students isn’t rocket science. It just requires education, diligence, and transparency. When used appropriately and safely, the internet is a great tool for research and social connection. For more advanced tips, check out our blog on internet safety for high school students.
From Chromebook parts to tech buyback, AGParts Education supports over 6,000+ school districts in their 1:1 device initiatives. For more info, contact us today!

by AGParts Education | Announcements, Chromebooks, EOL
Since their introduction in 2011, Chromebooks have won the favor of school districts and consumers alike. They’re affordable, secure, and lightweight. Lean on hardware and easy to repair, they’re the top choice for school districts’ 1:1 deployments. However, Chromebooks have a limited lifespan with each unit bearing an Auto Update Expiration (AUE), the date on which Google no longer supports OS updates and vital security patches.
But, did you hear? Earlier this month, Google announced they’re extending Chromebook AUE to a minimum of ten years. This significant extension begins in 2024 and means that existing Chromebooks will not expire in the next two years. How will this impact your district’s 1:1 deployment? Before we dive in, let’s look at what AUE is and its history.
About Chromebook AUE
Originally referred to as End of Life (EOL), AUE signifies the date on which Google will no longer support OS updates and vital security patches or provide technical support. Chromebooks are internet-based laptops and receive all their OS and security patches via Google. Although Chromebooks can be perfectly functional after their AUE, they won’t be supported by Google. Although Chromebook may no longer receive updates, it still performs a self-check when it boots and if it detects corruption, it reverts to its original state.
Originally, AUE was three to five years. Then, Google extended the date up to eight years on models that launched in 2020 or later. And now, Google had extended it once again to ten years.
For a complete list of updated Chromebook AUE, check out Google’s Auto Update Policy.
What Does This Mean for Your School?
There are many benefits to Google’s new policy. Extending Chromebook AUE could save public schools, and taxpayers, an estimated $1.8 billion. Here are other benefits of
- Chromebooks remain cost-effective: While an extended lifespan can’t prevent irreparable damage, it does mean your fleet will be covered with OS updates and vital security patches longer. Schools can expect to get more mileage out of their current Chromebooks in both performance and budget—less money spent on new units as current fleets are lasting longer.
- More control for technology departments: Schools have no doubt experienced offloading functional devices for no other reason than the AUE. With models gaining a minimum of two years, schools will no longer have to prematurely recycle their Chromebooks.
- Eco-friendly and sustainable: Less premature recycling of devices means less e-waste. Extending lifespan promotes sustainability, especially for schools that perform in-house repairs. Win-win!
How We Can Help
While Google’s policy changes, our mission remains the same: We help school districts reduce technology downtimes and stay within budget by empowering in-house repair through Chromebook parts supply and free Chromebook repair videos. Your district can still count on us for all your 1:1 deployment needs, such as:
- Chromebook parts supply: 500,000+ OEM new or recertified parts
- Buyback services: No-hassle process when your district is ready to offload its used fleet
- Free educational resources: An extensive library of repair videos to power your in-house repair program
AGParts Education is here for you every step of the way. Contact us today to find out why 7,500+ school districts nationwide trust us as their complete lifecycle management partner.

by AGParts Education | Chromebooks, Tips and Tricks
There is no other device that is more mysterious or more misunderstood than the Chromebook. After all, what is a Chromebook exactly? Why are Chromebooks so weird? Why don’t they have a caps lock key? Today, we’re breaking down the Chromebook basics that every user needs to know.
What is a Chromebook?
First things first, let’s put the mystery to an end. A Chromebook is a type of laptop that is run on the Chrome OS. Chromebooks are unique in that they are internet-heavy machines. They’re a favorite for ed tech programs across the nation because of their affordability and ease of use.
Chromebook Basics
Here are seven Chromebook basics to help you navigate your device like a pro.
1. Right Click
The most elementary of Chromebook basics, the right click. If you aren’t using a mouse, how on earth do you right click? Similar to other laptops, you can right click on a Chromebook by tapping two fingers at the same time on the touchpad.
Note: This will only work if tap-to-click is enabled, which is most likely enabled. If disabled, toggle the setting on under Mouse and Touchpad Device settings (Settings > Advanced > Manage Accessibility Features > Mouse and Touchpad > Open Mouse and Touchpad Settings).
You can also right click by pressing Alt while you click with one finger.
2. View all Keyboard Shortcuts
Chromebooks pride themselves on a streamlined approach, so it’s no surprise that they’re full of handy keyboard shortcuts. And, even less surprising, there’s a keyboard command to see all keyboard shortcuts. Press Ctrl + Alt + ? to view a keyboard overlay with keyboard shortcuts.
You can also check our handy guide to Chromebook keyboard shortcuts.
3. Customize Your Shelf
Customize your desktop by editing your shelf and its position. The shelf, aka taskbar or dock, is located at the bottom of your screen by default. It displays which apps are running and holds app shortcuts for easy launch.
Customize your shelf to reflect the apps you use most frequently. Here is how you add and remove apps to your shelf:
- Add an app: Use the launcher key to find the app you wish to pin to your shelf. Right click on the app icon and select Pin to Shelf.
- Add a webpage: Open the site you wish to add to your shelf. Click the snowman menu (three vertical dots), then select Create Shortcut. For a desktop experience, select open as window.
- Remove an app: Right click on the app icon in your shelf that you wish to remove and select Unpin.
Don’t like your shelf at the bottom of your screen? No sweat. Change its position by right clicking on the shelf and selecting Shelf Position. You can also hide the shelf by selecting Autohide.
4. Use Guest Mode to Share Your Chromebook
Since Chromebooks are so internet-centric, they rely heavily on the primary user’s Google account. You are always logged into your Google account for ease of access to Gmail and Google Drive. This can make sharing your Chromebook a bit unsettling.
Have no fear, Chromebooks do have a Guest mode that allow for someone to use your Chromebook without disturbing your settings or files. Simply select Guest Mode from the lock screen.
5. Turn Caps Lock On/Off
You may notice that your caps lock key has been replaced with another key which is clearly not caps lock. While we don’t imagine you’ll be using shouty caps that frequently, it’s handy to know how to use caps lock when you need it.
There are actually two ways to do this. Caps lock has been replaced with the launcher or search key which shows all your apps and launches Google assistant. You can change the functionality of this key under Keyboard settings by selecting caps lock under the Search field (account > settings > keyboard settings).
Or, if you like the functionality of the launcher/search key, just toggle caps lock on and off by using the keyboard shortcut Alt + search key.
6. Split Your Screen
This is a Chromebook basic to make you feel and look like the productive beast that you truly are. It’s especially handy for students that need to watch their teacher and take notes or complete assignments concurrently. There are a couple ways to do this. Pressing Alt + [ ] (both bracket keys) splits your screen into two tabs. Or press Alt + [ (left bracket) or Alt + ] (right bracket) to send a tab to the left or right side of your screen respectively.
7. Parental Controls
This is a great tip for anyone monitoring a student’s progress on their Chromebook. You can create a supervised user and then edit permissions, which allows you to block certain websites. If your device is managed by your school, there is a chance that your student is already using a supervised account.
Here’s how:
- Create supervised user: From the sign-in screen, click Add User then Create Supervised User. Enter child’s Google account info.
- Edit/manage permissions: Sign into your account and edit user permissions under Supervised Users Dashboard. Select Manage to edit which websites the user is allowed to view. To block a website, insert an asterisk in place of www in the web address, e.g. *.google.com.
This also works if you are sharing your Chromebook is your family computer. You can easily set up supervised accounts for your children, or anyone else in the household.
AGParts Education supports 7,000+ school districts across the nation as their complete 1:1 Chromebook deployment partner. Find out how we can help your district. Contact us today!

by AGParts Education | Chromebook Parts, Chromebook Repair
Ready or not, back to school is here. Soon, tech-tastrophes will descend upon many a technology department. As more schools opt for in-house repairs through dedicated IT departments or student-led electives, preparing your workspace with a Chromebook repair tool kit is essential.
Today, we’ll outline everything your school needs to be ready to replace “oh-no” with “oh yes!” (Spoiler alert: it’s more than your standard screwdriver and pry tool). Before we dive in, let’s review why more schools choose in-house repairs.
Why In-House Repairs?
A popular choice amongst 1:1 Chromebook deployments, in-house repairs offer these benefits:
- Ease of repair: Since parts of a Chromebook are few, repairs are generally straightforward, making repairs ideal to perform in-house.
- Cost savings: Only pay for parts rather than labor and parts.
- Time savings: Get your devices back into your students’ hands faster.
Chromebook Repair Tool Kit Essentials
Here’s everything you need for a Chromebook repair tool kit to handle in-house repairs like a pro. You can grab our entire repair kit here.

5-Piece Chromebook Repair Tool Kit
Anti-Static Accessories
Anti-static accessories include an anti-static mat and an anti-static wrist strap. These accessories provide grounding and prevent static electricity discharge that can damage a unit’s motherboard. While they’re essential when handling motherboards, it’s highly recommended to incorporate these tools into your regular repair routine.

Anti-static wrist strap
Organizers
Einstein famously quipped: “If a cluttered desk is a sign of a cluttered mind, of what, then, is an empty desk a sign?”
While it’s a great question to ponder, let’s agree the best workstation is organized, especially regarding Chromebook repairs. Work mats with organizers or containers can help you keep screws and components separated as needed. Bonus points if organizers are magnetic.
Incorporate a work mat with organizers but keep your motherboards protected by using it in conjunction with anti-static accessories.
Did you know? In a pinch or under tight budgets, you can use clean lids from food containers as quick, inexpensive organizers.

Silicone repair work mat
Tools
A good tool set is worth its weight in gold when performing Chromebook repairs. Here are the staples you’ll need:
- Screwdriver set – pick one with a magnetized head and changeable bits
- Spudgers/pry tools – a mix of metal and plastic preferred
- Tweezers
Other items that could be helpful are a carrying bag, eject pin, and ruler. Good thing our universal tool kit includes everything you’ll need for your in-house repairs.

78-Piece Universal Tool Kit
Lighting
Easily overlooked leaving you in the dark, appropriate lighting will make seeing those teeny tiny screws and handling components so much easier. Shoot for LED lighting that can easily be moved, like our Flexible USB LED Light with Desk Clamp.

Flexible USB LED light with desk clamp
Let’s face it, back to school can be filled with tech-tastrophes 😱 We’re here to make sure you can conquer anything that comes your way. We’ll help you minimize downtime and stay within budget with our large inventory of Chromebook parts, buyback services, and more. Contact us today!
Page 2 of 11«12345...10...»Last »
Recent Comments